Reusing Sites
•Save site as template
•Works for all sites except publishing sites
•Default template limit 10 MB
▫Change via command line
▫Change to max of 500 MB
Stsadm.exe –o setproperty–pnmax-template-document-size –pv524288000
•Does not save security

Site Templates Usage
•Save Site as template
•Saved to Site Template Gallery
▫1 per Site Collection
Use Template Globally
•Deploy via command line
•Add Template
Stsadm–o addttemplate–filename YourFile.stp –title YourTitle–description YourDesc
•Delete Template
Stsadm–o deletetemplate–title YourTitle
•List Templates
Stsadm–o enumtemplates
•After running Add/Delete IISResetrequired
List Templates
•No option for deploying globally
Feature deactivation
▫Removes functionality
▫Does not remove data created by feature
Setting trust level
▫WSS_Minimal(default)
▫WSS_Medium
▫Full (built in .NET Policy)
Code Access Security in SharePoint 2007 for Administrators
SharePoint Web Parts run with a Trust Level which is set in the Web.Config file for the entire Web Application allowing not just one Web Part, but all Web Parts to run with that trust.
The default trust level that the Web Application runs with is WSS_Minimal. Developers will normally request that this is set to WSS_Medium or Full which are the only other configurations possible unless the developer creates a custom configuration file.
Code Access Security – The Architecture
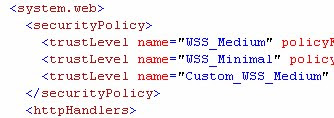
In the Web.Config file for the web application you will see two Trust Level Elements in the Security Policy Element pointing to the two configuration files stored in 12\CONFIG (localdrive:\program files\common files\microsoft shared\web server extensions\12).
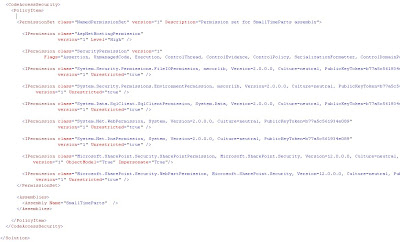
Each configuration file configures a number of classes by setting its properties. The classes are illustrated below.

The default Trust is WSS_Minimal which allows most code to run but would block your code from accessing SQL, The SharePoint Object Model, Environment Variables such as Machine Name and DNS etc. To allow these permission you would need to up the trust level to WSS_Medium, Full or to a Custom Policy. However, increasing the Trust Level for the Web Application would allow all Web Parts within that Web Application to run with more permissions. Best practice would be to create a custom policy and listing your web part in the file to run with the permissions it needs.
To create a new set of permissions you need to create a new file such as Custom_WSS_Medium.config and then make SharePoint aware of the file by pointing to it in the Web.Config for the Web Application. You can merge the settings in WSS_Minimal and WSS_Medium in your new Custom File to create your own permission set. It is advised not to change the original files as Microsoft may alter these files during the application of a Service Pack.

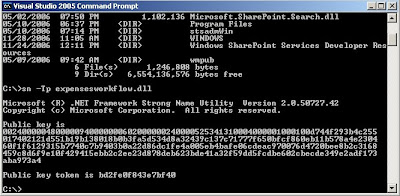
Each custom Web Part should be Strongly Named by the Developer which provides the DLL file for the Web Part with a Public Key. You can extract the Public Key using the SN tool provided by Visual Studio.NET: sn –Tp filename.dll
This will return the Public Key BLOB and the Public Key Token for the dll. Normally this would be a developer role as it requires Visual Studio.NET.

The Public Key Token is used in the Safe Controls entry in the Web.Config for the Web Part (Assembly) to register it as a Safe Control within the Web Application. The Public Key can also be used in the custom Trust Level Configuration File to give one particular Web Part or a group of Web Parts Full Trust whilst still leaving the Trust Level set to a minimal set of permissions.
To list a Web Part with Full Permissions within your Web Application whilst still retaining a WSS_Minimal permission set for all other Web Parts follow these steps:
1. Make a copy of the WSS_Minimal.Config file from the 12\Config folder and paste it into the same folder renaming it to Custom_WSS_Minimal.Config.
2. Edit the Custom_WSS_Minimal.Config file with an XML editor such as Visual Studio.NET or NotePad.
3. Obtain the Public Key Token and Public Key Blob for the Web Part assembly that you want to deploy using the following command: sn –Tp filename.dll.
4. Create a new entry in your Custom_WSS_Minimal.Config file for your Web Part:
version="1"
PermissionSetName="FullTrust"
Name="My custom Strong name"
Description="This code group grants code signed with the “My Custom
Strong Name” strong name full trust.">
5. Create a new TrustLevel element for your config file in the Web.Config called Custom_WSS_Minimal that points to your custom file in the 12\config folder.
6. Set the Trust Level of the Web.Config to Custom_WSS_Minimal
7. Recycle the Application Pool or run IISReset
8. Deploy & Test your Web Part.

No comments:
Post a Comment